Blog posts from feed-en-tech (#feed-en-tech)
Fing now won’t let me scan without giving my money, so I forked an old Android app for that (Altia).

Firefox have just ended this annoying popup.
Our guide to data models is here!
Last month, we explained on how we commonly design our REST API for our products. But apparently, some people still don't understand what the “model-centric path approach” actually mean. Now, we admit that it might be technical to explain here. In short, we are talking about data models, aka. how we commonly organize different sets of data. Since we all believe in object-oriented (OOP) software design, as well as object-relationship mapping (ORM) mechanisms, we adopt a strategy where a data model should be designated as a distinct Class (in OOP) and Entity (in entities, commonly in relational database design). Today, we are starting a new experiment on our digital garden. As we discussed last year, a digital garden is another way to organize ever-growing knowledge without forcefully having it to be perfect to be, a blog article, for example. And sure, there are some “plants” there that are more mature than others, and our explanation of Data Models could be one of them. When we talk about a data model, we’re not talking about one specific kind of data, but a group of data assigned according to a related context. It means that each data contained inside a data model should be related in a certain way. And that also means, data models are an efficient way to organize data to produce an information. Data Models on our digital garden. Now, no matter how deep are your current understanding about data, OOP, database systems, or so, we are trying our best to explain these concepts from beginners and up. So, why not just check it out at https://shift.reinhart1010.id/note/data-models?
HAM v1.1: Supporting tables and technical diagrams!
The version 1.1.0 was quickly withdrawn due to issues loading with custom tables HAM, our homegrown static Jekyll wiki framework now just got an update. Just like our past versions, this one is heavily motivated by our internal projects that are using HAM. With this new version, you can now render diagrams with Mermaid. Mermaid is an open-source language and engine that lets you render technical charts and graphs from plaintext, just like Markdown for rich text. Mermaid has been used in some notable Markdown-based apps that we personally love, including Joplin and GitHub. However, for the time being, we currently only support Mermaid when embedded inside a <pre class="mermaid"> HTML tag, instead of ```mermaid (as an annotated Markdown code block). The latter may clash with our existing syntax highlighting feature powered by Highlight.js. In our digital garden, we use Mermaid to render Entity Relationship Diagrams (ERDs) and Unified Modeling Language (UML) diagrams. And lastly, we also decided to add support for tables, just like our main website! If you have previously used other table markups, like the ones offered in Bootstrap 5, you will need to opt out from default styling by adding a special data- property, i.e. <table data-ham-ignore="true">.
Introducing HAM v1.0.4.
HAM is a simple Jekyll framework that allows you to build static wiki sites. And today, we are introducing a maintenance update with the following changes. First, the Bootstrap Icons dependency was updated from v1.11.1 to v1.11.3. There are no significant changes from the 100+ new icons introduced since v1.10. These icons are directly built into HAM, and you can simply use them in your Markdown source files as <i> HTML tags. (Just make sure you have reviewed their Web Accessibility recommendations on placing icons.) Next, we have also fixed a bug on v1.0.0 where users are redirected to the wrong YouTube URL when their web browsers do not support <iframe>. Well now, all modern web browsers supports that feature, and we're making this change to ensure that . HAM is not going anyway sooner. We still love HAM, and still use them on some of our internal projects. In fact, HAM still looks very nice on building another API documentation website like this: Of course, there are still some work to do. At least, readjusting the heading texts and adding more Liquid tags, and making these ugly tables more beautiful just what we recently did on our main website. So don't worry, we're still dogfooding HAM on our own.
Site Update: More glass-cards!
Our guide to our unwritten REST API conventions.
An updated version of this may be available on our digital garden. Naming things is a difficult thing, according to many developers. But not for someone who graduated in an university that’s silently houses great REST API experts. I’m not joking. According to HackerRank in 2021, BINUS University entered the top charts for Asia-Pacific universities (outside of India) according to their technical skills. And how did the university became the top 2 in REST API design, right after Rajshashi University of Engineering and Technology? Source: HackerRank, 2021. 1. Use semantic REST naming scheme. I know, there’s no such a standard term for “semantic REST API” like how it did with HTML, but there’s also a reason why HTTP requests are divided into GET and POST, which then added by PUT, PATCH, DELETE, OPTIONS, and others. We commonly use nested model-centric path approach, where the REST endpoint paths should be named after the model. No, we don’t mean GET /api/get-embed-from-post, but as straightforward as GET /api/posts/embed. Using the /posts/ prefix signifies the endpoint belong to the posts model. The model name must be referenced in their plural form. We first encountered this model-centric approach in Laravel, where controllers (as in the Model-View-Controller / MVC structure) are mapped into an opinionated set of REST request verbs (e.g. GET, POST) and paths. Taking from Laravel’s own example, we decided to define a similar schema: VerbURIDescriptionGET/photosGet an index listing of photos. Get (all) current photos. Can also be potentially used to search for photos.POST/photosSubmit a new photo.GET/photos/{id}Show a specific photo by its (internal) ID.PUT/PATCH/photos/{id}Update the photo information.DELETE/photos/{id}Delete the photo. You may also notice that some endpoints are not listed here. They are commonly used to display the front-end instead of doing the back-end logic. For example, GET /photos/{id}/edit does not edit the actual photo. It only shows a webform to the user, whereas the PUT/PATCH /photos/{id} one does the actual logic. Note: There are some obscure HTTP request verbs listed in https://www.w3.org/Protocols/HTTP/Methods.html that we don’t use, such as CHECKIN, LINK, and TEXTSEARCH. These are rarely recognized in HTTP request and server libraries, so they may just add an additional burden for us and others to implement. 2. Use kebab-case for paths, snake_case for parameters. Another common practice that we used here is to use kebab-case for REST paths and snake_case for parameters, even though that those are defined in the JSON format (which commonly written in camelCase instead). Yes, we do represent data model types (i.e. the kind of data being represented in objects, structs, and database tables) in PascalCase, but when it became part of the REST request, we use the former ones. You can learn more about the differences between these four naming conventions in the FreeCodeCamp. The reason why we used such conventions is to tolerate case-sensitivity, so user do not have to use certain uppercase letters to refer to the right data model. Additionally, web services conventionally used the snake_case for request parameters, so we leave the convention as-is for compatibility purposes. 3. Every response data should correspond closely to the enquired model. Well, we said we’re grouping things based on its model, right? So there has to be a standard way to represent the model and its items for each model-related responses. And that’s what we actually did: always map every model across database, source codes, and input/output serialization. In database, this means the table columns. In the source code, this is most likely to be objects (as in OOP) or structs as a fallback. In data serialization, we can use common serialization objects including JSON and YAML. We still do prefer JSON for REST API responses. For example, creating a new item under the model should give a HTTP response containing the new model, instead of simply signalling that “the insertion is complete” or just the item IDs. Similarly, when updating an item or two, the response should include the updated model items. There might be some exceptions for this, such as when doing batch processing, we could reduce the unnecessary response data load by signifying the updated item IDs, including which one were unchanged or faulty. In his own thesis, Reinhart listed his data type mapping across MySQL, MariaDB, Dart, PHP to ensure that the app’s entity models are properly represented from the database to the backend and frontend. 4. Our standard REST response. { "status": "OK", "data": /* ... */ "warning": /* ... */ } { "status": "KO", "error": /* ... */ "data": /* ... */ } Our standard response is always written in JSON unless a different format is required, e.g. returning an Atom/RSS feed in XML. This response is heavily inspired by the simplistic DuckDNS API and other REST API designs. We commonly fill in the error parameter with error codes, which may vary from system to system. Some of the common ones include {{MODEL}}_NOT_FOUND accompanied with the HTTP 404 status code and perhaps some additional diagnostic data located under the data paraeter. But some systems which require further debugging may return the error message as-is from the related software libraries on that error parameter. 5. Do not afraid of using HTTP response codes. HTTP 200 { "statusCode": 404, "data": "Blog Post not found." } The enterprise developer who made this should go to the hell! Source: https://twitter.com/goenning/status/1782330200958615637 Don’t worry, angry developers. We are still using HTTP status codes responsibly! 6. Now, what if we really need an endpoint that does not really fit into the above conventions? We have an internal term for it: import/export endpoints. They are endpoints which processes a standard model representation from or to the non-standard ones, such as importing items from CSV, or outputting a list of posts in Atom/RSS format. These endpoints do not follow some of our path conventions, but still need to contained inside a model path, such as /posts/feed and /products/import. The expected input and output data formats can deviate from the standard ones, too. Some of our systems also have to deal with other REST API standards, such as utilizing the /.well-known/ path for things related to digital identity and website verification. Many also respect the classic /ping endpoint, which expects to return a plaintext response of pong, to check whether the server is still active. And lastly, we also have a dedicated endpoint group, name /test. Since our model names are plural, we do not really care if the name conflicts with the model Test, since the model will eventually be represented as /tests/. These endpoints are meant for utilities to help developers integrate to our systems, such as /test/access-token to check whether an access token is still valid, and /v4/test/ping (alongside /ping) to check whether the service supports the REST API Version 4 schema.
GitHub: My robots are 2.5x as productive as I am.
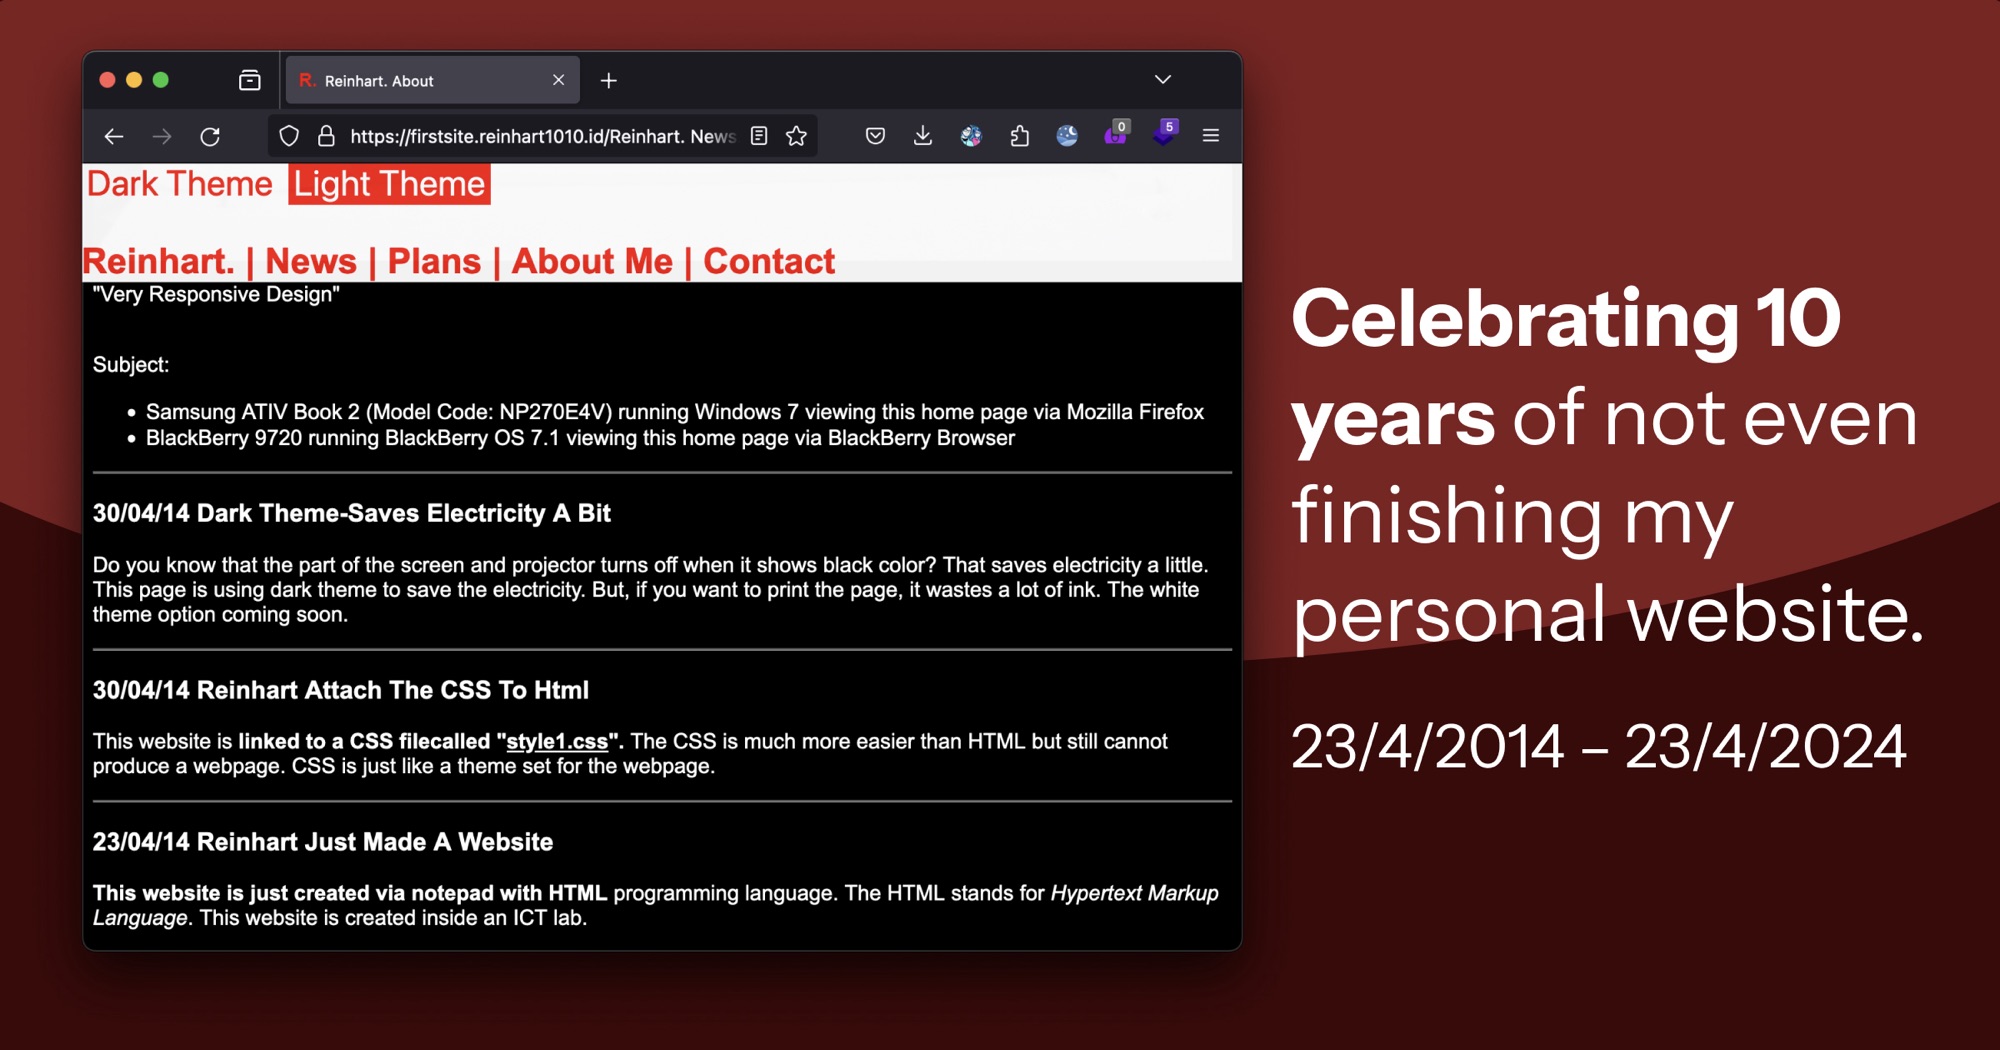
Celebrating 10 years of not even finishing my personal website.